
How to Assemble a DIY Carport Kit
CarportBay Editorial Team Reviewed
Last verified:
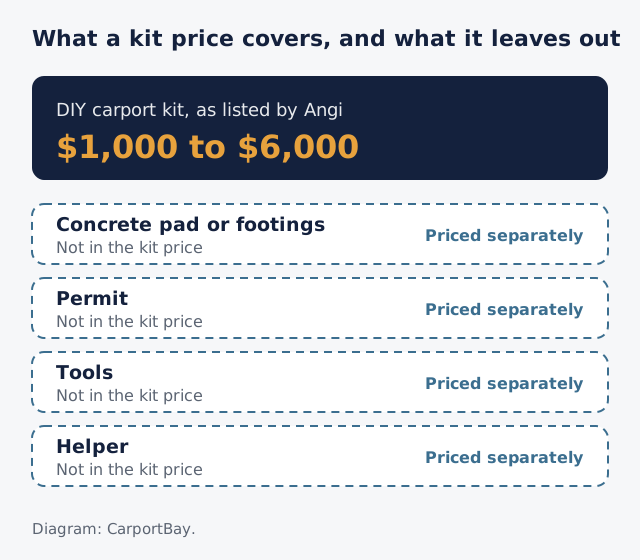
A DIY carport kit is a boxed set of pre-cut parts that you assemble on a pad you prepare. Angi lists DIY kits at $1,000 to $6,000 (updated May 2026), but footings, permits, tools and a helper cost extra. Check the kit's wind, snow and anchor notes before you order.

On this page
What a DIY Carport Kit Includes
A DIY carport kit is a boxed set of pre-cut, pre-drilled frame members, roof sheets, hardware and instructions, while the pad, the permit, the tools and a helper stay with the buyer. Sellers also call it a do-it-yourself carport kit, and the pad is the level slab or footings the frame sits on.
The finished structure is a carport, a roofed, open-sided shelter for vehicles. For the definition, read what a carport is. Table T1 shows who supplies each item and which seller says so.

| Item | Supplied by | Seller that says so |
|---|---|---|
| Frame members | Supplied byKit | Seller that says soViking, Carport.com |
| Roof sheets | Supplied byKit | Seller that says soViking, Carport.com |
| Hardware, screws, anchors | Supplied byKit | Seller that says soViking |
| Instructions | Supplied byKit | Seller that says soViking, Lyon |
| Pad or footings | Supplied byYou | Seller that says soCarport.com |
| Tools, helper, permit | Supplied byYou | Seller that says soViking, Carport.com |
Some kits are frame-only or roof-only; read the seller's parts list. Alan's says "pour your own foundation". Last verified 2026-10-06; sources: Viking kit page, Carport.com DIY kits, Lyon DIY vertical kit guide, Alan's kit page.
Carport.com lists 14-gauge American steel frames as standard, with a 12-gauge upgrade, and 29-gauge sheeting. Gauge is the thickness of steel.
For a side-by-side look at named sellers, see carport kits compared.
What a DIY Carport Kit Costs
Ten kit listings read on 2026-10-06 ran from $740.55 to $6,190.00, or $1.85 to $8.04 per square foot, which is 4.3 times from lowest to highest. The listings differ in size, roof style and scope, so the spread shows what kits include, not a ranking of sellers.
Angi lists DIY carport kits at $1,000 to $6,000 and installed 20x20 carports at $4,000 to $12,000 (updated May 3, 2026); the two ranges are not for the same size.
| Listing | Price (USD) | Per sq ft (USD) |
|---|---|---|
| Walmart, 20x20 steel kit | Price (USD)740.55 | Per sq ft (USD)1.85 |
| Select Sheds, 20x20 Arrow | Price (USD)1,348.99 | Per sq ft (USD)3.37 |
| Southeastern, 12x20 standard | Price (USD)999.00 | Per sq ft (USD)4.16 |
| VersaTube, 20x20 roof only | Price (USD)2,099.00 | Per sq ft (USD)5.25 |
| Viking, 12x20 vertical | Price (USD)1,695.00 | Per sq ft (USD)7.06 |
| Viking, 20x21 featured | Price (USD)3,375.00 | Per sq ft (USD)8.04 |
Prices are the sale prices on Google result cards or seller pages as read on 2026-10-06, not averages and not an endorsement. Price per square foot is price divided by width times length. The full ten run $1.85 to $8.04, 4.3 times; the VersaTube regular price of $2,607 is $6.52 per square foot against the $5.25 special shown. One of the ten is a frame-only kit and one is roof only, and the table says so. Per square foot, the six kits above run from $1.85 to $8.04. Last verified 2026-10-06; sources: Google result cards for Walmart, Select Sheds, Southeastern Building Products and VersaTube, and the Viking kit page.
For steel frames sold as kits, see metal carport kits.
For wood frames, see wood carport kits.
A kit price covers the box. Table T3 lists what it leaves out.
| Cost | What to plan for | Source |
|---|---|---|
| Pad or footings | What to plan forConcrete, forms, labor | SourceCarport.com |
| Permit | What to plan forLocal office sets fee | SourceViking |
| Tools | What to plan forDrill, wrench, level, ladders | SourceLyon, Viking |
| A helper | What to plan forOne person to raise frame | SourceViking |
| Wait time | What to plan forDelivery: 2 to 3 weeks | SourceViking |
Last verified 2026-10-06; sources: Carport.com DIY kits, Viking kit page and permit guide, Lyon DIY vertical kit guide.
For prices of finished carports of every kind, read what carports cost overall.
Check the Rating, Permit and Utilities Before You Order
Check three things before ordering a DIY carport kit: what the maker states about wind and snow, whether the local office wants a permit, and where the underground lines run.
Of six kit sellers read, only ShelterLogic prints a wind and snow figure on its kit page: 100 mph and 35 psf, for a standalone carport with proper anchoring per local code. The unit psf means pounds per square foot.
Read each row of Table T4 with how a carport maker and a seller differ in mind: a figure belongs to the company that prints it.
| Seller | Wind and snow stated | Where |
|---|---|---|
| ShelterLogic Arrow | Wind and snow stated100 mph; 35 psf | WhereKit page |
| Carport.com | Wind and snow statedCertified packages offered | WhereKit page |
| Viking | Wind and snow statedStamped drawings offered | WherePermit guide |
| Alan's Factory Outlet | Wind and snow statedNone on kit page | WhereKit page |
| Lyon | Wind and snow statedNone stated | WhereDIY guide |
| Canopia by Palram | Wind and snow statedNone stated | WhereCategory page |
Every row is a seller's statement, printed with the seller named. ShelterLogic states its figure for a standalone carport with proper anchoring per local code. Alan's prints a 150 mph and 35 psf standard on its building pages, which describe dealer-installed buildings; the kit page prints no figure. Last verified 2026-10-06.
This guide gives general information, not engineering, legal or contracting advice. Follow your kit maker's instructions and drawings, and ask a licensed professional about site conditions, anchors and loads.
A 12x20 kit covers 240 square feet and a 20x20 covers 400, both above the 200 square foot baseline in the International Residential Code, so the carport permit rules decide whether you can put one up. Building departments regulate the finished structure, not the method, so a kit follows the same permit rules as a site-built structure of the same size, says Viking. Local lines differ. Confirm current requirements with your local building department before beginning construction.
Call 811 a few business days before you dig; the service is free. 811 is the national call-before-you-dig number.
Kit makers set anchors with the base rails. Lyon puts rebar about 3 feet long through the base rails in step one of its guide, so this page checks the anchors twice, in step 3 and again in step 7.
Tools and Parts for a DIY Carport Kit
A kit assembly needs a cordless drill or screw gun, a wrench set, a level and tape, two ladders, snips and eye and hand protection, plus the concrete and anchors the kit does not box.
| Tool | Use | Listed by |
|---|---|---|
| Cordless drill or screw gun | UseFastening, torque set | Listed byLyon, Viking |
| Wrench set | UseBolts and anchors | Listed byViking |
| Level and tape measure | UseSquare and plumb | Listed byLyon |
| Two ladders | UseFrame and roof work | Listed byLyon, Viking |
| Snips or grinder | UseTrim and panel cuts | Listed byLyon |
| Gloves and goggles | UseProtection | Listed byLyon |
Last verified 2026-10-06; sources: Lyon DIY vertical kit guide and Viking kit page.
| Supply | Quantity from |
|---|---|
| Frame members and base rails | Quantity fromKit drawing |
| Roof sheets and purlins | Quantity fromKit drawing |
| Hardware and self-drilling screws | Quantity fromKit parts list |
| Eave and ridge trim | Quantity fromKit parts list |
| Rebar or anchor bolts | Quantity fromKit drawing |
| Concrete for footings or slab | Quantity fromTable T7 |
Last verified 2026-10-06; sources: Lyon DIY vertical kit guide parts headings and the kit makers' parts lists.
A base rail is the steel member laid on the pad that the legs bolt to, and a purlin is a cross member that carries the roof sheets.
How to Assemble a Carport Kit, Step by Step
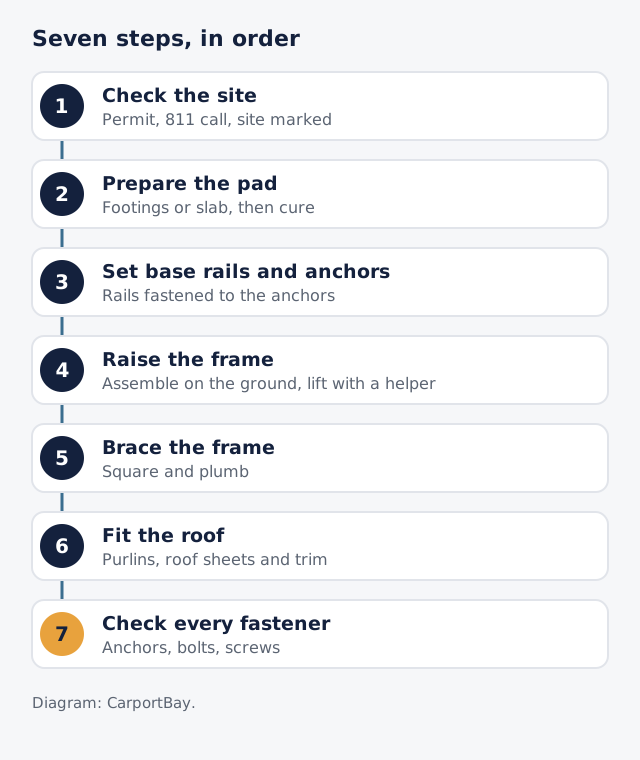
Assemble a DIY carport kit in seven steps: check the site, prepare the pad, set the base and anchors, raise the frame, brace it, fit the roof and check every fastener. For the metal-only version, read how to install a metal carport kit.
Seller guides rate the work differently: Alan's lists its seven-step guide as "Advanced" with a total time of "1+ day", and JLC puts the concrete cure at 28 days.
Check the Permit, Utilities and Site
Check the permit, call 811 and mark the site before ordering or digging.
Ask the local building office whether a kit of your size needs a permit. The International Residential Code baseline is 200 square feet, so a 12x20 (240) and a 20x20 (400) sit above it. Building departments regulate the finished structure, not how you assemble it, says Viking. Call 811 a few business days before you dig; the service is free. Clear the site and compare it with the kit drawing.
Prepare the Pad and Footings
Prepare the pad: dig footings or pour a slab, then let the concrete cure.
Mark the footings or slab from the kit drawing. Dig the holes to the depth the drawing and your frost line call for, or form the slab. Pour the concrete, using Table T7 to size the order. Ask the maker for its minimum cure time before you load the anchors. JLC says 3,000-psi concrete reaches rated strength in 28 days.
Table T7. Concrete to order for the pad, in cubic yards Pad Concrete (cubic yards) Six 12x36 in footings Concrete (cubic yards)0.52 Eight 12x36 in footings Concrete (cubic yards)0.70 12x20 slab, 4 in thick Concrete (cubic yards)2.96 20x20 slab, 4 in thick Concrete (cubic yards)4.94 20x20 slab, 6 in thick Concrete (cubic yards)7.41 Geometry only: a footing is a cylinder 12 inches wide and 36 inches deep (0.785 cubic feet per foot of depth times 3), a slab is length times width times thickness, 27 cubic feet to the cubic yard, no waste allowance. The kit drawing governs the footing size and count. The number of bags depends on the yield printed on the bag. Last verified 2026-10-06.
A 20x20 slab at 4 inches needs 4.94 cubic yards.
Set the Base Rails or Posts and Anchors
Set the base rails or posts and fasten them to the anchors.
Lay the base rails on the pad and square them to the drawing. Fasten the rails with the rebar or anchor bolts the kit lists. Lyon sets its rebar anchors, about 3 feet long, through the base rails in its first step. Use the anchor count and type on your drawing.
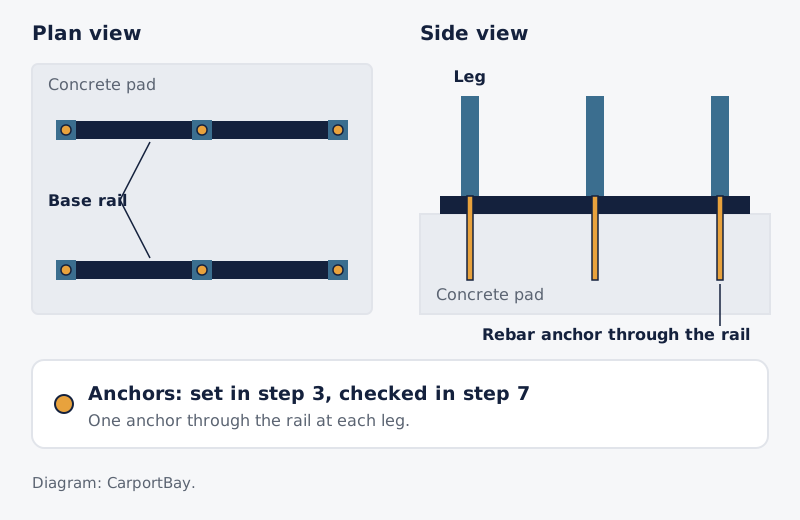
A base rail on a concrete pad with rebar anchors through the rail at each leg. The anchors are set in step 3 and checked again in step 7. Diagram: CarportBay. Assemble and Raise the Frame
Assemble the frame on the ground, then raise it with a helper.
This guide gives general information, not engineering, legal or contracting advice. Follow your kit maker's instructions and drawings, and ask a licensed professional about site conditions, anchors and loads.
Bolt the trusses or legs together on the ground with the supplied hardware. Raise each frame with a helper and fasten it to the base rails. Viking lists a helper and basic tools for its kit. Follow the order in your instructions.
Brace and Square the Frame
Brace the frame and check that it is square and plumb.
Fit the bracing the drawing shows. Measure both diagonals of the frame; equal diagonals mean it is square. Check each leg with a level. Lyon sets bracing twice, once before the frame stands and once after.
Fit the Purlins and Roof Sheets
Fit the purlins, then screw on the roof sheets and trim.
Fasten the purlins across the frame at the spacing the drawing gives. Lay the roof sheets from one end, overlapping as the instructions show. Screw each sheet with the supplied screws. Add the eave and ridge trim last, as Lyon does.
Check the Anchors, Trim and Fasteners
Tighten every anchor, bolt and screw, then walk the frame once more.
Return to each anchor and confirm it is tight. Check every bolt, screw and trim piece against the parts list. Look for gaps or loose edges in the roof sheets. If you pulled a permit, book the inspection.
Kit or Crew: When to Hire Help
A kit suits a buyer with a helper, basic tools and time to wait for the concrete, and a crew suits a buyer who needs stamped drawings, installation or experience the buyer lacks.
| Your situation | Better route | Basis |
|---|---|---|
| Helper and basic tools ready | Better routeKit | BasisViking |
| No building experience | Better routeCrew | BasisLyon asks for experience |
| Stamped drawings needed | Better routeAsk the maker first | BasisViking, Carport.com |
| Want installation included | Better routeDealer install | BasisAlan's offers it |
| Maker offers no install | Better routeLocal crew | BasisCarport.com |
Last verified 2026-10-06; sources: Viking kit page, Lyon DIY vertical kit guide, Carport.com DIY kits, Alan's kit page.
For installation by a crew, read about carport installation.
Scratch builds are a different job. To build a carport from scratch, you work from plans.
Read about carport plans for that route.
A kit leaves the pad, the permit and the checks with you, so plan those before the kit arrives.
DIY Carport Kit Questions
It depends on size and pad, because the ranges cover different sizes. Angi lists DIY kits at $1,000 to $6,000 and installed 20x20 carports at $4,000 to $12,000. Add the pad, permit and tools to a kit.
Often yes. A 20x20 covers 400 square feet, twice the 200 square foot baseline in the International Residential Code. Local rules differ, so ask the building office before you order.
Retail listings start lowest: a 20x20 steel kit at Walmart was $740.55 on 2026-10-06, or $1.85 per square foot. Compare what the box includes and any stated rating, not price alone.
More on this: carport kit buying guide.
The lowest of ten dated kit listings was $1.85 per square foot. That price leaves out the pad, permit, tools and a helper, which Table T3 lists. Scratch builds are a different job.
Yes, kit makers sell kits for self-assembly. Viking lists a helper and basic tools, and Lyon asks for someone with building experience. Check the permit and call 811 first.
Three 20x20 kits read on 2026-10-06 cost $740.55 to $2,099.00, or $1.85 to $5.25 per square foot. Angi lists installed 20x20 carports at $4,000 to $12,000.
More on this: 20x20 carport sizes.
Viking lists pre-cut, pre-drilled framing, roof panels, hardware, screws, anchors and installation manuals. Carport.com and Viking offer certified or stamped drawings. Ask which drawings come with the kit before you order.